

What is Google Search Console and how to use it?
In this topic, we will explain what Google Search Console is, how to sign up, and how to add your property.
Introduction
Google Search Console or Google’s Search Console is a free Google service that monitors everything published on the internet.
If you have a website or online shop, you can sign up here to become visible in search results.
Although Google would eventually detect something new, by signing up for this service, you can drastically speed up everything.
In addition, Google Search Console contains a variety of tools that can improve SEO optimization or alert you to various types of errors you make when creating your website.
Let’s go step by step.
Sign Up for Google Search Console
To sign up, you need to have a Google account already created, and if you use a Gmail email address, then you already have it.
The process starts with creating a new Property.
Here, we have two options: Domain or URL prefix.
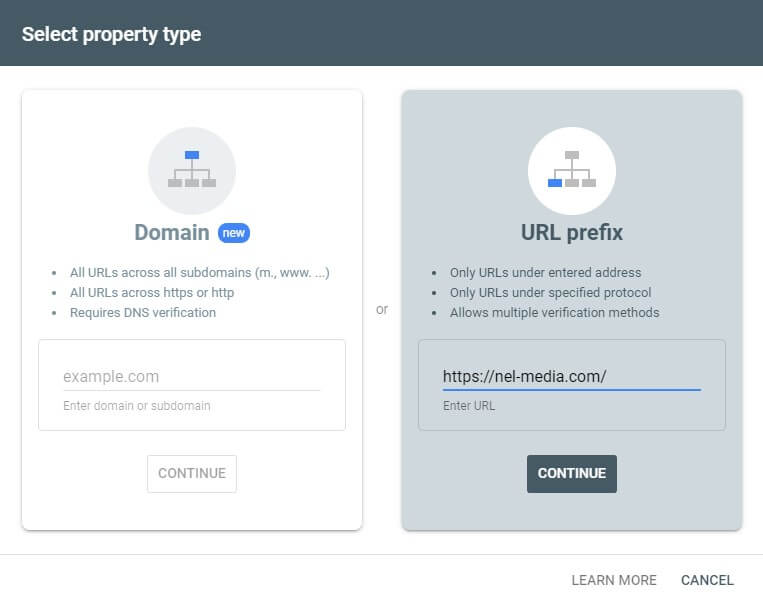
Regardless of which option you choose, you must first enter the domain name or URL of your website.
Website Verification via Domain
This option allows you to register the entire domain, meaning you will have access to information about all subdomains and URLs belonging to that domain.
If you want to track the performance of your entire website, including all subdomains, select this option.
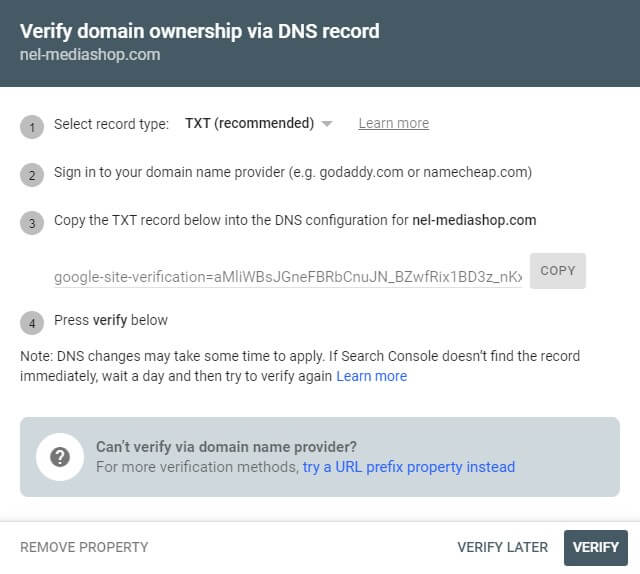
Here you will be offered a record as a text file for download.
- Copy the TXT record: A specific TXT record will be visible on the panel, which you must add to the DNS settings of your domain.
- Access your domain’s DNS settings: Log in to your account with your domain provider or DNS server. Find the option to edit your domain’s DNS records.
- Add the TXT record: Enter the information provided by Google Search Console into your DNS settings as a new TXT record. You will usually find the option to add a new record and select the record type as “TXT”. Paste the TXT record value provided by GSC.
- Save changes: Save the changes you made to your domain’s DNS settings.
- Verification check: After adding the TXT record to your domain’s DNS settings, return to Google Search Console and click “Verify” to complete the verification process.
If you do not have access to domain records, ask the company where you bought the domain to do it for you.
It is important to note that it takes some time (up to 24 hours) for the propagation to spread for successful verification.
Website Verification via URL
If you want to track only a specific URL or sub-page within your website, select this option.
This is useful if you want to get more detailed information about specific pages or parts of your website.
But you can also choose this option if you want to register the main domain and do not have access to DNS records (as in the previous example).
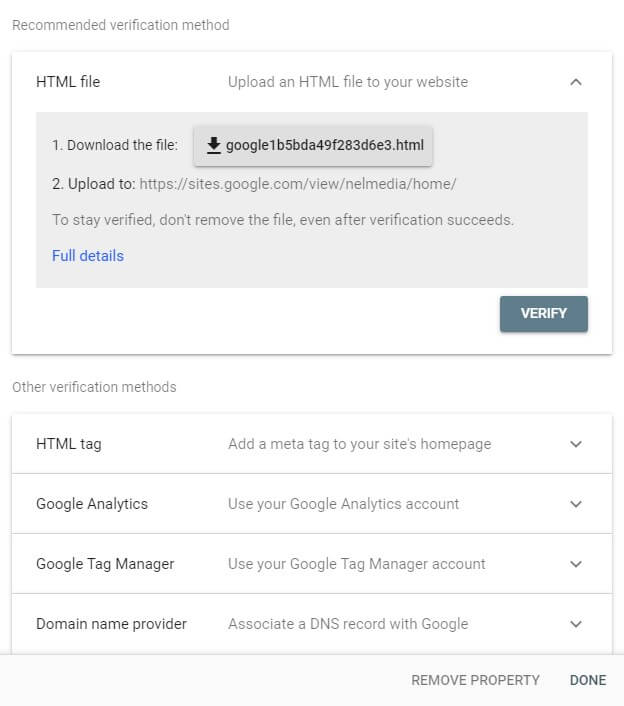
Here we have 5 different ways of verification.
- Using verification file (HTML File): Download the verification file provided by Google after adding your website to the Search Console. Then upload it to your server in the root directory of your website.
- Using HTML tag: Copy the HTML tag provided by Google after adding your website to Search Console. Then paste it into the appropriate part of the HTML code on your website, usually within the <head> tag.
- Using Google Analytics: If you are already using Google Analytics on your website, you can use the same account for ownership verification. Google will recognize the Analytics code on your website and automatically confirm ownership.
- Verification through Google Tag Manager: If you use Google Tag Manager, you can use the same account for ownership verification. Add the appropriate Google Tag Manager code to your website, and Google will recognize and confirm ownership.
- Domain name provider (if applicable): Download the text file offered to you and enter it into the DNS settings of your domain.
As you can see, URL verification provides more verification methods.
However, it also provides flexibility because you can register only parts of the website you want.
Adding a Sitemap
After confirming ownership, one of the most important things you need to do is to submit a website map (sitemap).
The website map is a file (usually in XML format) that contains a list of all pages on the website or web application.
This file helps search engines like Google better understand the structure of your website and index all its pages.
The sitemap usually contains basic information about each page, such as its URL, date of last change, update frequency, and importance relative to other pages on the website.
To upload the map, you must select Indexing > Sitemaps and enter the name of your map on the panel that opens.
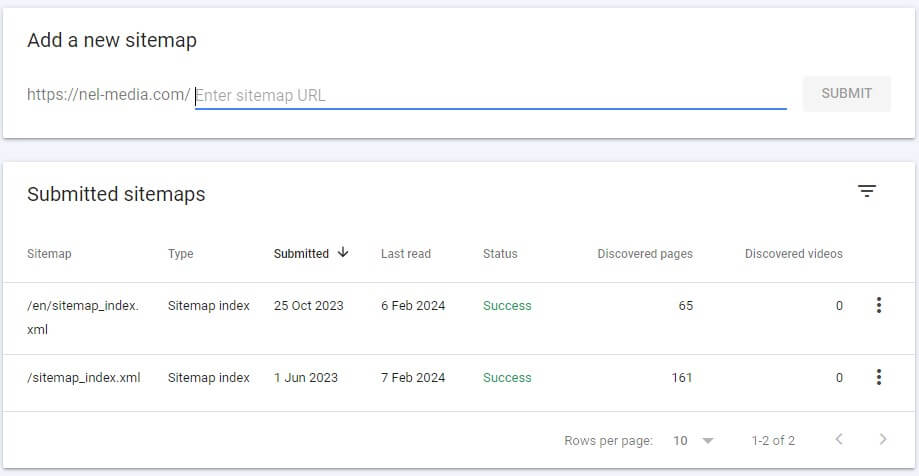
As you can see, the map must be located in the highest directory of your domain (root), and you only need to enter the name.
By clicking Submit, you will also receive a message confirming you have done everything correctly.
If the map is successfully uploaded, Google Search Console will take some time to index all the pages.
Fast Indexing a New Page (URL)
If you have created a new page and want it to be indexed and appear in search results as soon as possible, you will use the “URL Inspection” option.
By clicking on URL inspection, a small browser will open where you enter the URL of the new page.

First, you will see a message that the URL is not indexed.
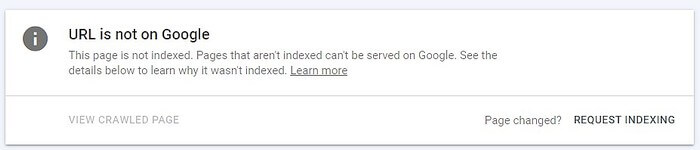
Before requesting indexing, it is good practice to review the page using the built-in tools.
Live test
A quick test (Live test) will run the website analysis program.
After the analysis, you can view its HTML code as well as the image on a mobile device (Screenshot).

If there is an error for any reason, under the “More info” option, you can see where the problem occurred.
Indexed page
After a maximum of 24 hours, you will see in the same data that the page has been successfully indexed.

Google Search Console will periodically crawl all pages to discover whether they have changed or new content has appeared.
In the upper right corner of this panel, you will see when the last check was performed.
If you still don’t understand the process, you can also watch a short film that explains everything quite well.
Other Search Engines
You can also sign up for other major global search engines to reach a wider audience.
These include Microsoft Bing, Baidu, and Yandex.
Frequently Asked Questions
Conclusion
We hope this detailed procedure will help even less experienced users index their websites to appear in search results.
We will soon provide a concrete example of loading code for WordPress and Google Sites users on the blog.
We will describe how to interpret the data and identify any issues in the next installment.
Recommended for Reading

Get the latest news!
Take a second, join our community, and discover the latest strategies and proven methods for earning extra income on the Internet.